CMake
| Category | Build |
|---|
Overview
CMake is not a build system but a tool for managing the build process.
CMake can generate project files for different platforms and toolchains.
CMake can run platform-specific commands to build targets (executables and libraries).
Since CMake 3.0, CMake is also known as Modern CMake and has been completely redesigned with a focus on targets and dependencies.
Information
Website: https://cmake.org/
Latest Release: 3.14
Download: https://cmake.org/download/
Documentation: https://cmake.org/cmake/help/latest/index.html
Principle
The principle of cmake is to generate the project files for a specific platform using a custom language in order to create a target.
A target is either an executable or a library and the cmake commands describe the requirements to build and use targets and setup their dependencies.
CMakeLists.txt files are added in a directory hierarchy to control the build process. They contain a list of commands in the cmake language to control the build system.
cmake has two main steps: configure and generate.
Configure
Parse the CMakeLists.txt files in the current folder to generate a CMakeCache.txt in the build folder.
cmake automatically detect platform and compiler features. The generated file can be inspected to see the exact configuration that cmake uses to setup the project.
Generate
Generate the project files in the build folder using a specific generator and the CMakeCache.txt from the configure step.
Build
cmake can also build the generated project.
Organization
Directories
Directory that contains a CMakeLists.txt file are entry points for the build system. Subdirectories that also contain a CMakeLists.txt file can be added to the build by calling the add_subdirectory() command.
Modules
Modules files can be added to the build system by calling the include() command.
Modules have the .cmake extension. They are located using the CMAKE_MODULE_PATH variable.
Scripts
cmake can execute commands without generating project files using the -P option with a script file name. Some commands are not available when running cmake in script mode.
For example, if you write a script file called script.cmake, you can run it with the command:
cmake -P script.cmakeLanguage
Commands
The cmake language is based on commands and every statement is a command.
- Commands are written with a command name (case insensitive) and parenthesis.
- Commands can have input parameters (some are optional).
- Parameters are separated with spaces.
- Commands have no return value.
- Commands are written on separate lines.
- Comments start with
#.- A comment can be appended after a command.
- Multi-line comments are supported and can be nested.
- Flow control and operations on variables are also based on commands.
To print a message to the standard output, call message().
message("Hello World.") #prints a messageVariables
Every variable is a string.
Lists are also strings with items separated with the ; character.
A variable reference has the form ${<variable>}. For example the variables NAME is referenced with ${NAME}.
message("Hello ${NAME}.")Variables can be set in the command-line with the -D options immediately followed by the variable name, an equal sign and the value. The -D options must be placed before the -P option.
cmake -DNAME=World -P script.cmakeVariables can be manipulated in scripts using commands as well.
Variables are defined in a specific scope.
A variable is set with the set command. To set a variable from a parent scope, add the PARENT_SCOPE specifier.
A variable can be removed with the unset command.
set(NAME "World")
message("Hello ${NAME}.")
unset(NAME)
Built-in variables
cmake provides built-in variables related to the project workspace and current platform.
if(WIN32)
    message("Running on Windows.")
endif()
System variables are booleans set to true if CMake is running on the target system.
- WIN32: Windows x86 or x64
- APPLE: macOS, iOS, tvOS or watchOS
Functions and Macros
Custom functions are defined with the function() and endfunction() commands.
Functions create a new scope for variables.
function(<name> [<arg1> ...])
  ...
endfunction()
Custom macros are identical to functions but they do not create a new scope. They are defined with the macro() and endmacro() commands.
Files
cmake can include other script files with the include command.
The script files are included in the current scope.
cmake can import other projects with the find_package command.
cmake can add a subfolder to the build with the add_subdirectory command.
cmake will look for a CMakeLists.txt file in the specified folder and create a new scope.
Best practices
These commands affect every targets and should be avoided:
- include_directories()
- link_directories()
- link_libraries()
- add_definitions()
- add_dependencies()
- add_compile_options()
When referencing a path such as the target_include_directories() command, do not use a parent path.
Makefile
The role of the makefiles is to define the targets to build. There should be at least one target.
A root CMakeLists.txt file must contain at least two commands.
- The
cmake_minimum_requiredcommand sets the minimum required version of cmake for the project.
- An executable or library target.
- The
add_executablecommand adds an executable target to be built from the source files.
- The
add_librarycommand adds a library target to be built from the source files.
- The
Targets
Commands related to target requirements have a target_ prefix. They have an optional specifier to indicate the kind of the requirement that is described.
PRIVATE: build requirement
INTERFACE: usage requirement
PUBLIC: build and usage requirement
Packages
CMake is able to load settings for external projects (or package) with the find_package command.
CMake searches for a file called Find<package>.cmake in the CMAKE_MODULE_PATH folder.
If the package is found, cmake create imported targets that you can use in your own target dependencies. cmake will also set two variables:
<package>_INCLUDE_DIRS: the include paths
<package>_LIBRARIES: the shared libraries
Running CMake
There are different methods to run cmake.
- Command-Line. cmake is a command-line tool that can be run to generate the project files and build the executables.
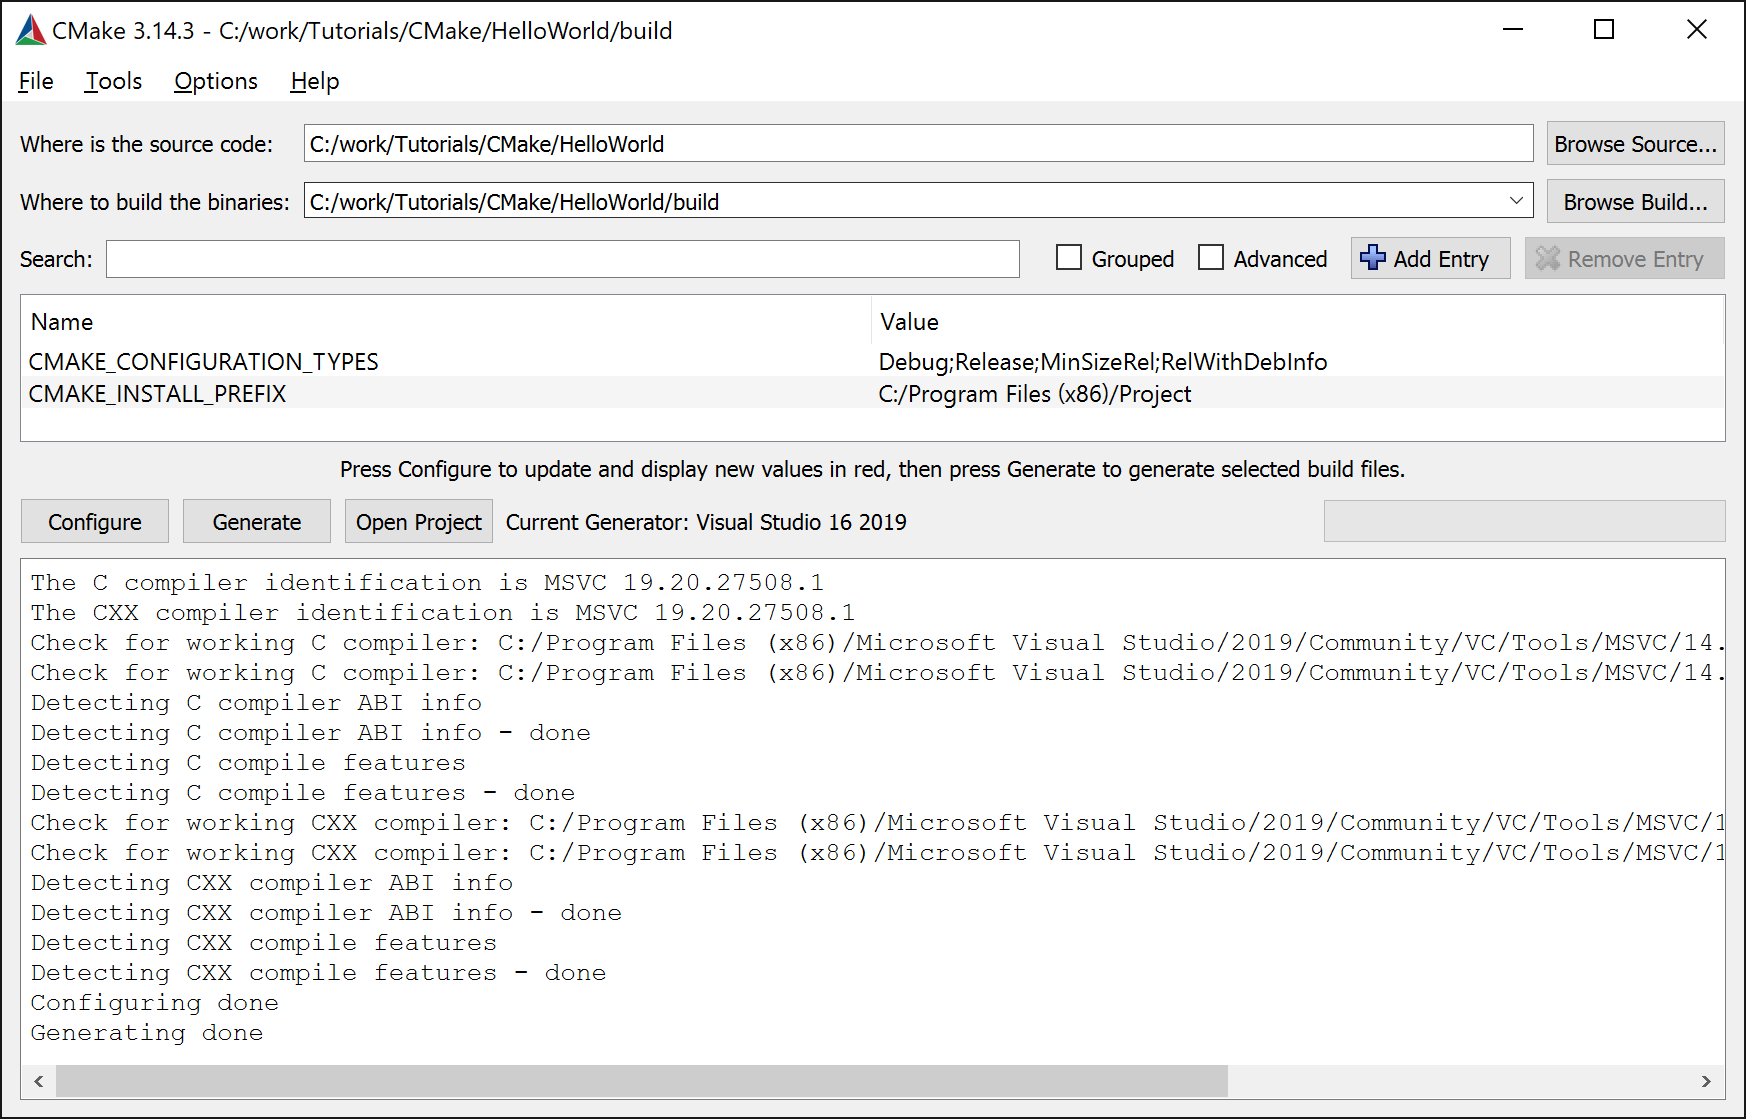
- GUI: cmake is installed with a GUI program where you can specify additional variables and setup the generator, toolset and platform.
- Visual Studio: cmake is integrated with Visual Studio. A folder can be opened directly by Visual Studio without the need to generate a solution and project files.
Command-Line
cmake builds the project in the current folder and the first parameter is the path to the root CMakeFiles.txt file.
Before running cmake, we create a new build subfolder where the project will be built.
We run cmake from the build folder and specify .. to indicate that the root CMakeFiles.txt file is located in the parent folder.
Optionally, we provide the -G and -A parameters.
-G specifies the build system generator. For example: -G "Visual Studio 16 2019" or -G "Xcode"
-A specifies the platform name. For example: -A x64
Finally, we run cmake.
mkdir build
cd build
cmake -G "Visual Studio 16 2019" -A x64 ..
cmake generates a .sln Visual Studio solution file and several .vcxproj project files.
cmake also generates ALL_BUILD and ZERO_CHECK projects. They are included in the solution file but can be ignored.
We can open the solution file in Visual Studio to build and run the project.
Alternatively, we can compile the project by calling cmake with the --build parameter and . to indicate the current folder (build).
cmake --build .On Windows, cmake will build the build\Debug\HelloWorldProject.exe executable file.
GUI
The cmake GUI can be used instead of the command-line.
We specify the project folders in the GUI.
- Where is the source code: the root folder of the project.
- Where to build the binaries: the
buildsubfolder.
When clicking on Configure for the first time, cmake asks for the generator and platform.
We specify Visual Studio 16 2019 for the generator and x64 for the platform.

We click on Generate and the project files are generated.

Visual Studio
Visual Studio 2017 and 2019 supports cmake.
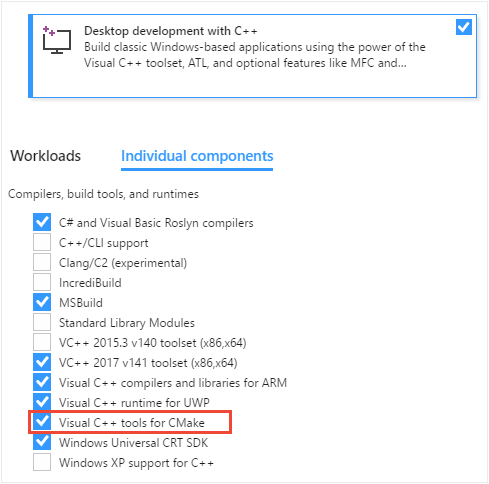
When installing Visual Studio, you need to include the Visual C++ Tools for CMake components in the Desktop development with C++ workload.

To open a project folder that contains a root CMakeLists.txt file.
From Visual Studio
- Open Visual Studio and choose
Continue without codein the welcome window.
- Click on
File/Open/CMake...and select the root CMakeFiles.txt file or
- Click on
File/Open/Folder...and select the folder that contains the root CMakeFiles.txt file
From the Explorer
- Right click on the project folder that contains the root CMakeFiles.txt file, and click on
Open in Visual Studio.
Visual Studio detects the cmake project, and can generate the project files for us.
The CMakeCache.txt file can be opened by clicking on Project/CMake Cache/View CMakeCache.txt.
By default, Visual Studio uses the Ninja generator.
The solution explorer displays contains the source files and CMake files.
The build and run commands work as expected.
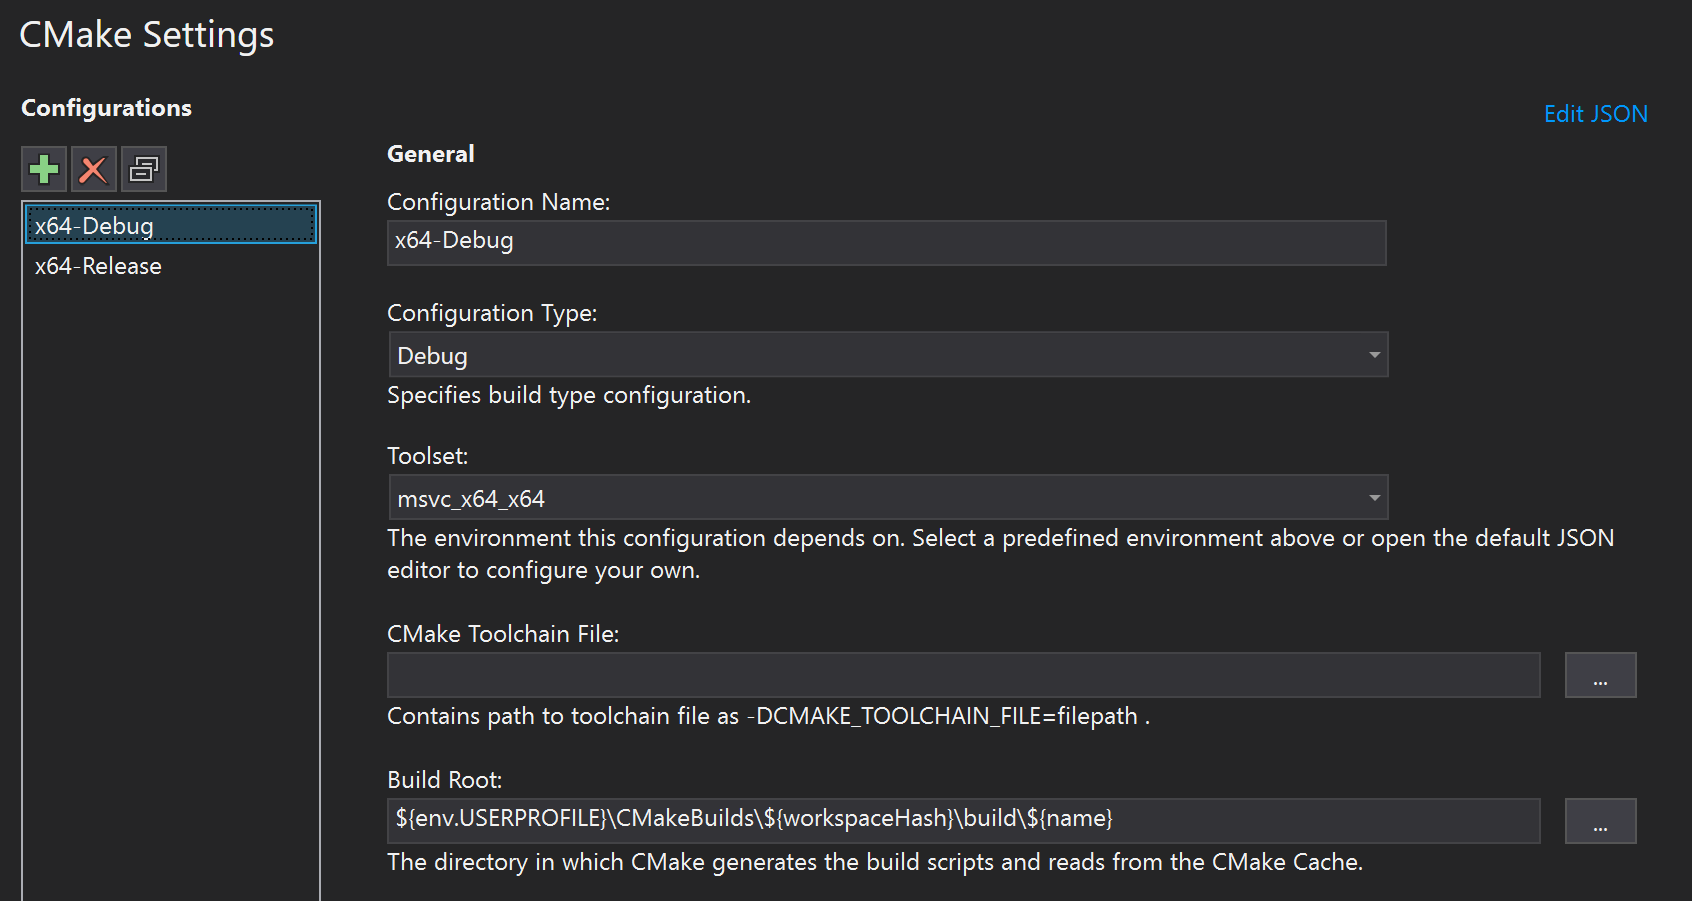
Visual Studio 2019 introduces the CMake Settings editor.
The configuration manager is replaced by the CMake Settings editor.
Visual Studio generates a CMakeSettings.json file in the root folder and the changes in the editor are saved into this file.

We can specify project configurations that will be saved in the json file.
References
- CMake projects in Visual Studio, https://docs.microsoft.com/en-us/cpp/build/cmake-projects-in-visual-studio?view=vs-2019
- CMake in Visual Studio 2017, https://www.3dgep.com/cmake-visual-studio-2017/
Tutorials
Basic
In a new empty folder, we create a simple C++ source file called main.cpp.
#include <iostream>

using namespace std;

int main()
{
    cout << "Hello World." << endl;
    return 0;
}
In the same folder, we create an empty CMakeLists.txt file.
This file contains the commands run by cmake to build the project.
In this first example, we only need three commands.
The first command is cmake_minimum_required to set the minimum required version of cmake for the project. We specify the version 3.8 which is also used by default with Visual Studio 2019.
cmake_minimum_required(VERSION 3.8)We call project to specify the name of the project. The generate project files will use the name provided in this command. We use HelloWorldProject.
project(HelloWorldProject)We call add_executable to add an executable target to be built from the source files.
The first parameter is the name of the project. We use the project name HelloWorldProject.
- On Windows, it is the name of the .exe executable file
- On macOS and iOS, it is the name of the application bundle
The second parameter is the list of source files. In this simple example, there is only one source file: main.cpp.
add_executable(HelloWorldProject "main.cpp")The complete CMakeLists.txt file.
cmake_minimum_required(VERSION 3.8)

project(HelloWorldProject)

add_executable(HelloWorldProject "main.cpp")
Root
There are built-in variables that we will reference many times.
CMAKE_CURRENT_SOURCE_DIRis the path to the current source directory.
There are several built-in variables that should be set.
CMAKE_CXX_STANDARDset the value forCXX_STANDARDof every targets. We want to use some of the modern C++ features but to ensure cross-platform support, we constraint the sources to use C++ 14.
set(CMAKE_CXX_STANDARD 14)CMAKE_CXX_STANDARD_REQUIREDset the value forCXX_STANDARD_REQUIREDof every targets. We want theCXX_STANDARDproperty to be a requirement.
set(CMAKE_CXX_STANDARD_REQUIRED ON)CMAKE_MODULE_PATHis a list of directories specifying a search path for CMake modules to be loaded using theinclude()command. We create a subfolder calledcmakewhere we will add additional .cmake files. To add this subfolder to cmake, we append the new subfolder to the existing list.
set(CMAKE_MODULE_PATH ${CMAKE_MODULE_PATH} ${CMAKE_CURRENT_SOURCE_DIR}/cmake)- By default the temporary and final binaries are built inside the
buildfolder. To specify a different folder, we set three variablesCMAKE_RUNTIME_OUTPUT_DIRECTORYis the directory containing the runtime output artifacts (.exe and .dll files on Windows).
CMAKE_LIBRARY_OUTPUT_DIRECTORYis the directory containing the library output artifacts (.dll files on Windows).
CMAKE_ARCHIVE_OUTPUT_DIRECTORYis the directory containing the archive output artifacts (.lib files on Windows).
set(CMAKE_RUNTIME_OUTPUT_DIRECTORY ${CMAKE_BINARY_DIR}/bin)
set(CMAKE_LIBRARY_OUTPUT_DIRECTORY ${CMAKE_BINARY_DIR}/lib)
set(CMAKE_ARCHIVE_OUTPUT_DIRECTORY ${CMAKE_BINARY_DIR}/lib)
The source files are created in a folder hierarchy inside the src subfolder.
The src folder contains another CMakeLists.txt file. We include it in the build by calling add_subdirectory().
add_subdirectory(${CMAKE_CURRENT_SOURCE_DIR}/src)CMAKE_DEBUG_POSTFIXis a string that can be appended to the debug binaries. It allows both debug and release binaries to exist in the same folder.
set(CMAKE_DEBUG_POSTFIX "_d")CMAKE_SUPPRESS_REGENERATIONcan be set toONto prevent cmake from generating theZERO_CHECKproject.
set(CMAKE_SUPPRESS_REGENERATION ON)BUILD_SHARED_LIBSis boolean that indicates whether the libraries in the build system are built as static or shared libraries.
Libraries
A project is typically composed of several libraries.
To add a library to the build, call the add_library() command.
- The first parameter is the name of the library.
- The type of library should not be specified here (static or dynamic library).
- The list of source files follows.
add_library(my_library [source1] [source2 ...])The list of source files can be added manually but it does not scale well.
set(SOURCES
    "src/ui/ui.cpp"
    ...
)
set(HEADERS
    "include/ui/ui.h"
    ...
)

assign_source_group(${SOURCES})
assign_source_group(${HEADERS})

add_library(my_library ${SOURCES} ${HEADERS})
An alternative is to perform a directory lookup that matches source files extensions (.cpp, .h) using the file() command. The GLOB_RECURSE mode traverses all the subdirectories and match the files.
On macOS, .mm files should also be added to the source files.file(GLOB_RECURSE SOURCES
"${CMAKE_CURRENT_SOURCE_DIR}/*.cpp"
"${CMAKE_CURRENT_SOURCE_DIR}/*.h"
)
add_library(my_library ${SOURCES})When creating a library we call additional commands to specify:
- Include directories with
target_include_directories(). The specified folder will be added to the include folder of the clients of the library. Useful to distinguish public and private interfaces.
- Library dependencies with
target_link_libraries(). The specified libraries are dependencies.
- Compiler flags with
target_compile_options(). The flags will be constrained to this library when using thePRIVATEspecifier. Alternatively, theCMAKE_CXX_FLAGSvariable can be set, but is is not recommended as it affects every targets. Flags depend on the platform and toolsets so there should be some logic to determine the appropriate flags on each supported platform.
add_library(my_library …)

target_include_directories(my_library PUBLIC "include")
target_link_libraries(my_library PUBLIC other_library)

if(MSVC)
    target_compile_options(Math PRIVATE /W4 /WX)
else()
    target_compile_options(Math PRIVATE -Werror -Wall -Wextra)
endif()
Visual C++
On Windows with Visual C++, cmake sets the CMAKE_CXX_FLAGS to /W3 to force the warning level to 3 (the default setting of Visual Studio).
When setting a different warning level using the target_compile_options() command, Visual Studio will output a warning.

A solution is to remove the flag from the CMAKE_CXX_FLAGS variable.
if(MSVC)
    if(CMAKE_CXX_FLAGS MATCHES "/W[0-4]")
        string(REGEX REPLACE "/W[0-4]" "" CMAKE_CXX_FLAGS "${CMAKE_CXX_FLAGS}")
    endif()
endif()
Folders
Visual Studio and Xcode support folder hierarchies to organize source files, but by default cmake includes every source files in a flat structure.
Source files can be organized in folders in the generated project files by setting the USE_FOLDERS global property to ON.
set_property(GLOBAL PROPERTY USE_FOLDERS ON)When adding source files in a library, call the source_group() command to also add the source to the corresponding group.
file(GLOB_RECURSE SOURCES
    "${CMAKE_CURRENT_SOURCE_DIR}/ui/*.cpp"
    "${CMAKE_CURRENT_SOURCE_DIR}/ui/*.h"
)

source_group("ui" FILES ${SOURCES})

add_library(UI ${SOURCES})
If the library has source files in subdirectories, this method will not be sufficient to create the corresponding groups.
The get_filename_component() command can be used to extract the name of each subdirectory and create the corresponding groups for cmake.
foreach(SOURCE IN ITEMS ${SOURCES})
    get_filename_component(SOURCE_PATH "${SOURCE}" PATH)
    string(REPLACE "${CMAKE_CURRENT_SOURCE_DIR}" "" GROUP_PATH "${SOURCE_PATH}")
    string(REPLACE "/" "\\" GROUP_PATH "${GROUP_PATH}")
    source_group("${GROUP_PATH}" FILES "${SOURCE}")
endforeach()
References
- CMake in Visual Studio 2017, 3dgep.com, https://www.3dgep.com/cmake-visual-studio-2017/
- C++Now 2017: Daniel Pfeifer “Effective CMake", https://www.youtube.com/watch?v=bsXLMQ6WgIk
- CppCon 2017: Mathieu Ropert “Using Modern CMake Patterns to Enforce a Good Modular Design”, https://www.youtube.com/watch?v=eC9-iRN2b04